Posts

Infinite Sprockets

Image
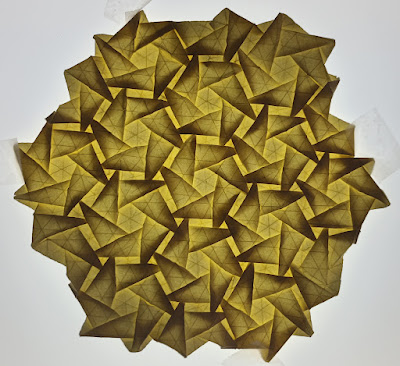
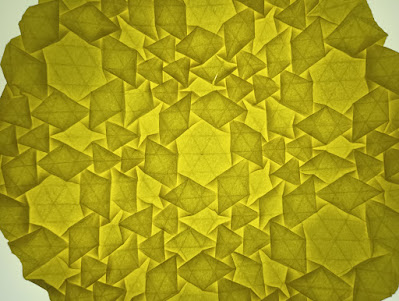
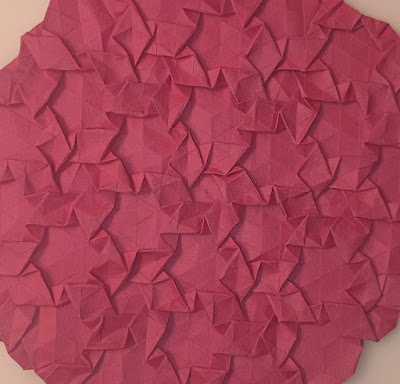
  This is a tessellation that I came up with after having done a very similar one. That first one ( Controlled Chaos Origami Tessellation ) had exceedingly small rectangles, which made it nearly impossible to execute cleanly on both sides.  In this case, I made the rectangles bigger and it became infinitely more manageable.  I'm pretty sure that I've seen this one before. I think that I've seen it done by  Daniel Kwan as a crease pattern posted to his flickr account.  I was not using that crease pattern while conceiving of this, though I did have some recollection of having seen it in the past.  The front is all right triangles.  The back side is small offset hex twists, the aforementioned rectangles and small triangle twists.  Even with the larger rectangles, it's still a difficult to fold tessellation. The triangles and rectangles overlap each other.  My crease pattern diagram is at the end of this post. 

Partners in Crime Tessellation

Image
 This one has a bunch of shapes in it, all working together to form the whole.  When creating a tessellation, I usually just start with one shape that interests me at the moment.  From there, I choose whether it'll be a six axis or a three axis rotational repeat. In other words, will I try to repeat it around some form of triangle or some form of hexagon.  Once I have a starting point, I mess around with additional shapes which may help me to further create repetitions.  The last step is just to figure how to fill in any gaps that are created.  In the case of this tessellation, I started with natural triangle twists off of the six edged pyramids shown in the first photo.  At the point, I added an open back triangle twist to repeat the natural triangles. Rhombuses were the final puzzle piece needed.  On the reverse side I wound up with some rhombus based cubes and two different sizes of negative space triangles.  This tessellation is not difficult. I was able to execute it using ord

Torn Maps Origami Tessellation

Image
 This is tessellation is interesting because I actually messed up the pattern that I had created. It still looks really cool, but it is asymmetrical.  My original diagram called for all the repetitions to match each other.  This is also another difficult to execute to design. Regardless of whether you follow the pattern precisely or you accidentally. deviate from it as I did, it's pretty intense to fold.  My tant paper actually tore a little bit in one spot from all the stress.  The center is easy enough to get situated, but after that all bets are off.  It starts with an open back hexagon around which are situated interconnected rhombuses.  From there I just add a whole lot of triangles and more rhombuses. The pattern is meant to be three triangles and two rhombuses and then repeat the center.  I have included my crease pattern diagram at the end of this post. 

Origami Tessellations: Flock of Seagulls

Image
 This tessellation was pretty ambitious undertaking. When I plotted it out on some grid paper, I knew that it would be kind of crazy, but I loved the design too much to not try.  At the center point is an open back hexagon. From there I add three trapezoids and three triangle collapses.  Then I add another layer of trapezoids.  This in turn, creates the opportunity to add a whole bunch more small triangle collapses. Ten total per third edge.  It is ridiculously difficult to get all those triangles to work together while also making them behave nicely with the repeating trapezoids.  Obviously, it is doable, because I did it, but it's pretty tedious.  Well worth it though, for the end result.  I actually messed up the orientation for one of the triangles. Can you spot it? The nice thing about folds like this one is, once you get everything collapsed, it's not hard to re-orient the directions  of some of the folds if you need to do so.  When working with tessellations like this on

Flowers in the Garden Tessellation

Image
 Here's a fun little tessellation that utilizes just a few not too difficult techniques to create a moderately intricate pattern.  Rhombuses twist off from offset hexagons on their reverse.  Then on the outer edges of the rhombuses we add some open back hexagons.  At that point, the pattern can be easily repeated.  It's relatively simple compared to a lot of the tessellations that I've done in recent years.  It's a great exercise in some basic ideas that can lead to many other interesting configurations.  It also concisely demonstrates the close relationship between rhombuses and hexagons in geometric origami tessellations.  It would probably back light beautifully using thinner paper for those interested in folding it.  I used tant paper. The more pastel colors light up well, but the darker ones, unfortunately, do not.  Just another thing to keep in mind when crafting your tessellations.  Diagram below. 

Controlled Chaos Tessellation

Image
 This is a tough one. Right triangles around an offset hex twist. When you go to repeat the pattern these very tiny rectangles are in the spaces between the points of the triangles. It's doable, but you probably need really thick paper in order to end up with a neat reverse side.  My tant paper worked for the front, but on the back I was only able to get some of the rectangles to land neatly.  In the diagram below they show up as micro rhombuses, but when you twist them they form very small rectangles.  Either kraft paper or elephant hide would be your best option for getting everything really neat on both sides of the paper.  As I was working with this pattern, it began to feel familiar. As if I might've seen it somewhere else. Perhaps on Aresniy K's instagram feed. I'm not certain. But I wasn't actively solving anyone's else's design when I came up with it. 

Origami Tessellations: Spare Tires

Image
 Here's an unusual tessellation that uses a few different techniques.  It begins with a small hexagonal twist. Pretty typical.  Next, we have trapezoids spinning off from it. They are situated to twist the hex on bisected axes rather than the natural ones.  I call this an offset hex twist. Instead of using the grid lines to twist the hexagon, you create folds that bisect them and twist the hexagon that way.  The trapezoids have open back triangles in the spaces between them.  These open back triangle twists are not symmetrical three ways. They connect slightly differently to the next set.  There are also small triangle collapses tucked into the ends of the trapezoids. that connect to the next repetition.  All this is made more clear in the crease pattern provided at the end of this post.  Instead of having different shapes on the reverse side, this tessellation is a mirror image of itself on the back. 

Origami Tessellation: Antimatter Chambers

Image
 This tessellation builds off the concept of using a small hex twist on bisected axes.  A conventional hexagonal twist is turned on the axes that follow a triangle grid. However, you can also twist them offset from the grid.  Doing this opens up new options with what shapes you can combine them with and how.  In this case, I did rhombus twists around the hex.  What happens next is pretty cool.  We add open back hexagons off of the points of the rhombuses.  Once you get that first set of central rhombuses in place, it's not too difficult from there.  On the reverse side of the tessellations are the offset hex twists and some parallelograms.  Crease pattern is included below. 

Origami Tessellation: The Solstice

Image
  If you're in the mood for a tessellation that looks complicated, but actually isn't, this one might interest you.  The pattern begins as open back hexagons with rhombuses collapsed along their edges.  From there, rather than a straight up repeat of the pattern, I added an additional rhombus before moving on to the next iteration.  Open back triangle twists fill in the gaps where six rhombuses converge. .  There are also small triangle twists on the back in the areas where two rhombuses connect along the edges of the hexagons.  In the center module, I alternated the valley and mountain connections of the double rhombuses in order to create consistent patterns for the outer repetitions.  The second photo shows all the triangles on the reverse side of the tessellation. I've also included some closeups of each side with less back lighting.  I have a diagram. Will add it soon. Diagram added.    

Solving Cogs Origami Tessellation

Image
 This is a tessellation by gatheringfolds called 'cogs'. I didn't have any trouble solving the center, but my 16 pleat tester didn't fit the rest of the design.  I decided to just go ahead with a full 32 pleat execution and figure the rest out as I went.  Once I had enough space to work out the rest, it wasn't too difficult. Some plain printer paper stood up pretty well to my final adjustments.  It's a rather large tessellation that doesn't really repeat on a 32 pleat grid. Still, I liked it enough to go ahead with it anyway.  I gave a little thought to how it might repeat in a smaller space. But that's an idea for another day.  The center is a small hex twist with trapezoids emanating from it. Open back triangle twists fill in the gaps of the central module.  To repeat it there are large pyramidal shapes as well as long parallelograms. Personally, I like the pattern on the back (second pic), a little better.  I used ordinary printer paper. The various s

Origami Tessellations: Spiral Staircases

Image
 This is a modification of a tessellation by Arseniy K called 'Pixelated Chrome'. I changed it up to repeat  on a smaller grid.  The structures are very similar, but the results are different. Mostly because I used paper that backlights really well.  I used the same size rectangles, but smaller, natural triangles.  It's a pretty easy to fold tessellation. I encountered no difficulties with the execution.  I used white, 28 lb printer paper folded into a 32 pleat triangle grid.  The diagram for my version is included at the end of this post.  The crease pattern for his is available on his instagram feed. 

Shy Hexagons Origami Tessellation

Image
 This is a pretty simple tessellation that has some interesting patterns.  What I wanted to do was tuck some open back hexagons under some straight lines. This is where I arrived with that.  I kinda mostly worked on the reverse side pattern more during the conception than I did the front.  The front has forward facing open back hexagons connected to long parallelograms.  In-between the parallelograms are more hexagons hiding shyly. Hence the name.  On the reverse side are small triangle twists around the prominent hexagons.  You can also see how the shy hexagons are formed.  As I said, it's one of your less intense tessellations. I just used plain printer paper and had no issues.  I believe that I have a crease pattern for this. Will upload it when I find it.  Update: crease pattern added below. 

Origami Tessellations: Quilted Lattice

Image
  While perusing Instagram, I came across a new tessellation by Aresniy K called 'Wheel of Misfortune'.  As I was working out its construction, it occurred to me that a really beautiful variant was possible.  His is a circular style pattern of long parallelograms tucked into each other.  In my case, I went with a linear weave pattern of the same shapes.  While it's pretty basic from a conceptual standpoint, it yields, what I think, is an impressive finished product.  On the front, it's all parallelograms. They need to be long enough to accommodate tucking the perpendiculars into each other.  On the back side, micro rhombuses are the main component.  I didn't create a a diagram for this one. It wasn't really necessary. It's just the one shape repeatedly tucked into itself at 45 degree angles.  Once you begin folding the front, the small rhombuses on the other side are mostly forthcoming.  I used a 32 pleat triangle grid and that had room for plenty of repetit

Hesitant Helicopters Tessellation

Image
 I created this tessellation from back to front. The idea for the layout was initially the three open back triangle twists around a small triangle twist.  But as I worked the design and interacted with the paper, the concept shifted in my mind and the front became the back and vice versa.  Interesting how that happens every so often. Planning can only account for so much. Sometimes theory is eclipsed by execution.  The now front side is comprised of open back hexagons and small rectangular twists. When backlit, they almost appear to be spinning.  The other side is the aforementioned sets of triangles.  The trickier ideas will often surprise you, even when you think that you've got it all figured out.  Crease pattern included at the end. 

Origami Tessellations: Unexpected Detours

Image
This is a layered tessellation that combines rhombuses and trapezoids.  The rhombuses form a circular pattern around an open back hexagon. The next layer is the trapezoids nestled on top of the rhombuses.  The trapezoids are repeated in a triad around an open triangle twist. That then creates the opportunity to repeat more sets of rhombuses around open back hex twists.  It's a somewhat intricate pattern that's best viewed in closeup.  However, it isn't very difficult to fold.  I used tant paper in a pink hue folded to a 32 pleat triangle grid.  For your denser tessellations like this one, it's best to use a sturdier paper.  Interesting thing about tant paper. I actually spilled some coffee on it while in the middle on completing this tessellation.  Figured it was trash, but I wiped it down and waited for it to dry and was able to move forward almost as if the spill had never happened. Pretty impressive that the paper could do that, especially being manipulated so hea